This tutorial features the Zebra ZT410 model. Other Zebra models have similar print menus; therefore, this tutorial may work for other Zebra printers. Check your printer before changing your settings.
Step 1 - Loading the Ribbon
Unless you are working with direct thermal material, you will not only need to load your media, but you will also need to load your ribbon as well! The direct thermal method requires no ribbon because, as the name implies, heat is applied directly to a heat-sensitive media to create the print. If printing on direct thermal media, you can skip this step.
The thermal transfer method uses heat to transfer ink from a ribbon to the material. Zebra printers use CSO (coated side out) ribbons, meaning the ink is on the outside of the roll. Load the ribbon onto the supply spindle and push it against the printer. Turn the yellow and black latch counterclockwise to lift the printhead and feed the ribbon under the printhead. You can check the yellow path guide in the below graphic on how to load your ribbons properly. Ensure the ribbon is securely attached to the rewind spindle by either winding it tightly around the uptake spindle or using tape. A print error will appear if the ribbon becomes detached while printing.

Step 2 - Feed Your Media
In the video above, we loaded our media first and ribbon second. It does not matter which you do first as long as they are both loaded correctly. To load rolled media, place your roll of labels or tags onto the media spindle in the back and secure it with the metal guide. The labels we used in the video are facing out on the roll, so we are following the dotted blue path guide in the above graphic. If you want to print on the inside of the roll, you can turn the roll around on the media spindle and follow the solid blue path.
If using fan-folded material, insert them through the bottom or rear media slot. Then, feed your media through the guides above the sensor light. Slide the yellow media guide to where it lightly touches the edge of the paper to keep it from shifting during the printing process.
Step 3 - Aligning The Sensor
To properly calibrate your printer and avoid potential error messages, ensure the sensor light is in the correct position. The printer's sensor is a yellow "knob" which can slide back and forth under the print head. Its position will vary depending upon the type of sensor feature between each tag or label (Mark, Gap/Notch, or Continuous). Be sure to position the sensor to where the tag's sensor feature will pass directly over it before leaving the printer.

If your media has a black bar separating each label or tag, this is known as a "Black Mark" or "Mark" media type. Black marks can run partially or fully across the width of the media. The sensor reads from the bottom, so in either instance, you will need to place the black mark side FACE DOWN as it goes through the printer. Partial black marks should be on the left side of the media as it comes out of the printer. Slide the sensor light directly underneath the black mark as shown below.
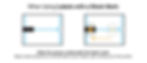
Media without black marks (such as notched tags or labels with exposed liner space) use the "Notch/Gap" calibration setting. When using notched media, place the sensor where the notch passes directly over it. If you only have a notch on one side of your media, then position it on the left side of the media as it feeds through the printer.

To properly calibrate your printer to labels with a liner gap space, slide the sensor under the middle of the gap as shown. If your label is a unique shape, position the sensor so it passes over the point where the gap is the smallest.

Step 4 - Calibrate Your Printer
Once the sensor is positioned, close the printhead by sliding the yellow and black latch back down until it fully clicks in place. Start the calibration process by navigating to "Media Type" in the "Settings" sub-menu and selecting the type of media previously determined when adjusting the sensor. Additionally, there is an option for "Continuous" if you are dealing with plain media without any sensor feature. Next, navigate to "Print Method" to ensure that "Thermal Transfer" is selected if you are using a ribbon.
After using the arrow keys to switch to your proper settings, navigate back to "Home" to save your selections automatically. Press the pause button to begin auto-calibrating. It's common for the printer to send out some blank tags. It will stop once it completes the calibration. When the printer displays "Printer Ready," it can be put back online for printing. You can test to see if your printer is calibrated correctly by hitting the "Feed" button on the printer. If it feeds one tag or label, then you are good to go!
Troubleshooting
If the auto-calibration fails, try readjusting the sensor before running another calibration process. Additionally, it is helpful to double-check that the settings on your computer's print dialog box match the calibration settings on your printer before sending a print job. Many times, the print settings on your computer will override the settings on the printer, causing errors.
Still having issues? Give us a call! We won't leave you stranded!

215 S. Pioneer Blvd.
Springboro, OH 45066
www.trebnick.com
orders@trebnick.com
937-743-1550